Friday, February 7, 2025

New telecaster


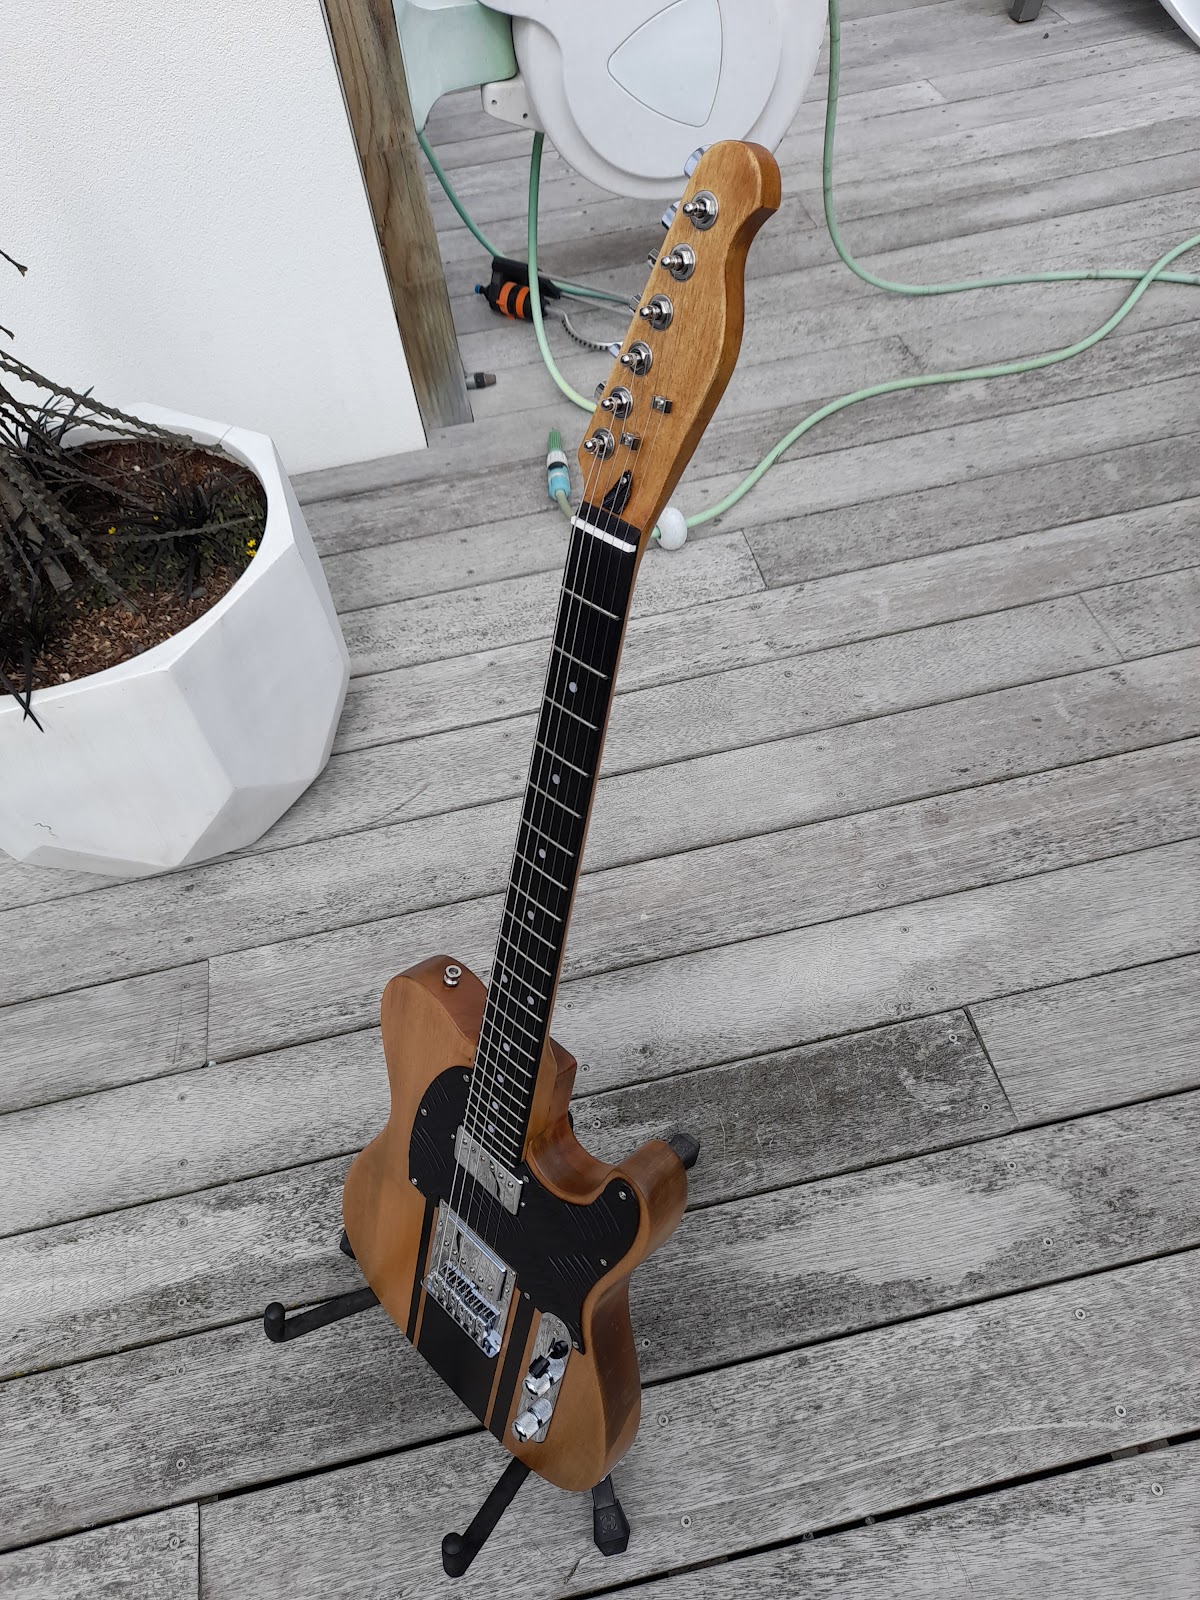
Bought a Telecaster kit from Artist guitars
stained and painted stripes.
Replaced pickguard with aluminium deck plate matte black
Next job, build a case. Will upgrade electronics and tuners.


Thursday, January 30, 2025

True - Bypass Looper Box - 5 in 1 - steampunk


WARLOCK- Steampunk


My inspiration for this pedal was the wood. In the right light it's dark with a red underbelly.
Couldn't help but think it's kinda evil. Witchy. Went from there.
With a theme like that. It's got to be Badass. I've always known about a boutique kiwi pedal builder called RedWitch and I knew they made a fuzz god, had a look and lo and behold the circuit

Fuzz Main With A Wrath Footswitch,, Sounds goodie.


Gathered my bits and as before I used sketchup for some initial design work.


Also had to use Inkscape to create etch masks.


Ordered some parts for the circuit, found the transistors needed in a metal can version, so thought I'd mojo the circuit a bit as well and started building. While I'm building I'm thinking seeing as I've only used Rune symbols for the knobs, I could really put any circuits I like in it. 2 even. All the pots and switches are for the fuzz god circuit and with so many it also gives you plenty of options for a duo combination. At the time it was just a thought.
The metal cans were duds in the end. Spec'd way low. BC109's are now bc549 in a silicone package and common as you get, so put them on the shopping list.

I had a circuit made up and working for the Catalinbread "Dirty little secret MKII". uses 5 pots and 2 switches. Waiting for me to come up with a box design. Left with one knob. mmm. The ZVEX super hard-on seems to get a rave. I've wanted to make one. So I decided to put them in for now. In the end I changed the boost to a crackle not OK version. the crackle on the original seemed to come through all the time, not just when I dialed the pot. Badass, Evil, Black sabbath, Metallica running on 18v via  switchable charge pump) coupled with a hot little booster. It's WARLOCK DOOM by accident. The circuit has a presence trimmer which I decided I wanted to mount as an external pot and managed to squeeze one of the smaller packaged pots I pulled from the fried marshall in on the side, covered with a bit from a compressor valve,


Sweet Honey Deluxe - Steampunk


Since I put my first Sweet Honey clone on my board I find myself using it as the go-to if I'm not fixed to a certain pedal for a certain song.
We play a mix of covers and original numbers. They range quite a bit from each members taste, so we mix it up so we're all happy. One guys from an Irish band background, the Bass-man likes the heavy stuff, and I've always been most interested in alternative rock heading into punk sort of vibe. Along with many, many other styles.
I find this pedal capable of sounding good in a lot of our songs. Really good in the blues- rock area. Basically it's on the permanent list.

I didn't like my last Tayda printed art job and decided to upgrade the box.

I find surfing the web, looking for ideas, styles I find interesting, is the best way for me to try and come up with something I like. I find and save lots of pictures, patterns, stuff I think may be useful. If I see a style I like, it's like , yeah that's kind of what I was looking for and I start forming ideas based on what I've seen. So - originality? maybe not entirely, but I don't want to outright copy anyone by any means. My problem is I'm terribly much more a logical type than the artist.
In all honesty this pedal is very much a mix of both with some originality I will claim.
My searching eventually led me to some SteamPunk looks. I'm the first to admit I was most inspired for this look by SVISOUND. If you haven't seen, take a look svisound. For me, it was like, yep this is where I've been going.. next level, and sort of what I'd like to incorporate in some of my builds. 
steampunk honey factory came to mind. The industrial honeycomb feature ventured into my thoughts as a possible feature. I decided if I'm going to try this I'll draw it in Sketchup first, to get a decent look at it before I commit to anything and make sure everything I'd found to possibly use for this look .was going to place well and help me plan the processes to make it.


I've been using Sketchup a long time now to help with projects I work on. The logical needs to know what it will look like. what do i need, can i do it?

I found some old blocks of hardwood and sliced them up on a table saw and have a selection of a few flavors now. This is an old piece of Rimu with a rather thick coating of a glossy clear coat to look like it's covered in Honey.
Scrounged the draws for anything brass or useful, bought a few things, brass plate, wire, jewellry trinkets, colored glass. I did manage to use a fair bit of recycled bits.Like the knobs are reused plumbing fittings. Epoxy resin is very useful.

LOT OF TIME to make this one from draw to finish. It's a hobby, I do it cause It's what I enjoy doing, for me the time is irrelevant. More importantly - MISSION ACCOMPLISHED.

The Sweet Honey Overdrive - Deluxe


Wednesday, January 29, 2025

Master Blaster - EQ + EP Boost + Clean Boost


Loving the look of the Delay I just made, Using the same slider knobs I removed from an old Technics unit, it was natural to design this one in a similar fashion. If you want to make something that looks like this by hand, it takes a fair bit of time. Drawing/ designing, cutting, filing, polishing metal, the whole etching process, epoxy resin coloring , top-coating, putting it all together, circuit and off board wiring. It all adds up. But hell it's worth it.
This pedal will replace the MXR 109 6band Eq      ( which I always had to leave on, because it had a tone-sucking buffer system when it was switched off, but did work well on) and the BOO instruments boost which is also a great clean boost pedal. This is a double pedal  solution for a bit more space on the board


The box is a 1590BB2 and contains 4 seperate circuit boards all up.

1  The EQ circuit is haha a straight replacement for my old one, the MXR 109 6 band - NOW with true bypass. Thanks to Dirtbox layouts again - link here     dirtbox MXR . I was quite happy with the old one when it was on and this circuit works exactly as well.

The Clean Boost, controlled by the 2nd footswitch is again from Dirtbox - Creation Audio Labs 4.23 Clean Boost dirtboxlayouts search CREATION.
It is a crystal clean boost and matches my Boo Instruments very well. You'll need an opa2134 IC and I used a MAX1044 for the built in charge pump .

3 A 2nd boost The Xotic EP Booster Dirtbox has a layout for this easily found. I used the one from Mark @ tagboard layouts as the vero size suited me better to fit it in. It is switchable with a 3pdt toggle switch, led indicator on bottom plate. I didn't want a 3rd footswitch and I am now using the EP as an almost always on end of chain volume control with a little bit of magic to it. Whereas the clean boost is for upping the game a bit for solos etc so it gets the footswitch. On the back of the pedal I have externally placed a dipswitch. This is for the fat and bright switches you will see on the circuit, which set different ways can give you a 3 mode selection of Std -unity- vintage. The original pedal has this inside the pedal I believe. You could also set these up as 2 separate on-off toggle switches if you want.
Circuit No 4 is actually a separate, toggle switchable 18v charge pump for the EP booster. More headroom at the end of my chain. You bet.

There's even another strip of vero in here for the row of LED's. I'm often using more than 1 in my designs and have started fitting multiple LED setups to vero with resistors on board.
All of this required tidy wiring, careful placement extra insulation between circuit boards, but I've managed to fit it all comfortably with no issues. one circuit is placed components down.

The pedal itself is fantastic sounding 1, 2 and 3 on seperate, together, whatever. It really is a     MASTER BLASTER

Tuesday, January 28, 2025

Memory Man with a PT2399


I've finally found a circuit worthy of replacing my  Memory Boy -for me. I use delay subtly and especially just like the tone my EHX  adds to my sound, dark, spacious, analogue - just nice. It's not moving for anything less. This has made the grade. I've set it up side by side and been able to get it to sound the same on settings I use, and it has a lot more functionality, and it uses a readily available PT2399 IC.
 
The circuit originates from Madbean - the discontinued "Dirtbaby". In their own words " an honest attempt to recreate a Memory Man with a PT2399". The circuit has been traced on Dirtbox layouts and thanks to him can be found here dirtbox - madbean .

I read up a lot on this one and have modified this some. Added a switchable charge pump to 17v, placed the trimpot on top which does give me some less/more effect options. I've a few component values based on recommendations for a darker tone. Just found my notes I grabbed while researching

NOTES

 So I finished a couple Dirtbabies lately, one for a friend and one for me.

It's simply the BEST PT2399 delay I've built.

I changed C10 (1,5nf instead of 1nf) and C12 (150nf instead of 100nf) for less noise and a very slightly darker tone (still quite bright!)
R4 is about 30k (raising C12 raised the volume also), and R35 is 56k. C14 is a 47uf tantalum (I read in the notes from valvewizard that using a tantalum in that place was better, so I keep doing it with every PT2399 circuit I build)

The first opamp is a BB OPA2134 and the second one is a OP275.

I added a charge pump to run it at 18v (much better in my opinion!) and also added a couple things:
- a tone switch that adds another 1,5nf in parallel with C10 for a much darker delay
- a slam footswitch with internal trimpot accessible from behind, to decide how fast it ramps towards oscillation.

I t's seriously not a difficult build, as long as you take your time to plan everything well.

I'd recommend to socket all opamps and PT2399 of course, but also :
R4 (feedback resistor. In mine, 33k)
R35 (mod rate. In mine 56k)
R37 (mod depth. Kept it stock in mine)
C8 (just in case, cf build doc. Stock in mine)
C9 and C10 (in mine C10 is 1,5nf, helps with the noise, though it cuts a tiny amount of treble response. Still bright enough for me. Far brighter than the analog mode of my Echo Park, which is supposedly modeled after a DMM)
C13 (will alter the way the repeats degrade, keeping more treble in a tape-like way, cf build doc)

And I definitely recommend a charge pump to run it at 18v. So much better in both my builds!! (and that's the reason I use a IR9022 instead of TL062 for the LFO, since 18v is the maximum voltage allowed for TL062)  


I stuck with the 17v charge pump as I've used the TL062 for reasons as above. A vero layout for this can be found on tagboard effects along with many other useful little circuit tools. As with the mods I did use, I suggest socket - experiment once you've got a working thing.

Aside from all the options this pedal offers, the level/volume control is a big pro for me. The memory Boy always give a volume increase which is a pain in the A** . Now I can get unity.

It's not a pedal I would attempt first, there's a bit going on. But I highly recommend to do at some stage.
It is now my full-time delay - main board.

I'm stoked with the look of this one. Continuing on now from the protein look. Adding a bit of colour,
I've found UV cured epoxy, cheap as chips from TEMU, China. It's great. You can tint it, apply it, and when you're happy, cure it. This is my first use of it instead of paint to colour the etching cavities. Still a clear coat on top too.

I picked up some 50k slider pots for an EQ/Boost pedal I'm thinking about next and was able to use one of the extras here. Looks retro. Stole the slider knob off an old Technics HI-Fi Eq I got with my record player.

Making your own Pedz from the shed Rulez :-)


Blues 2 Rock - Protein


My next project I've decided is the Protein. I found the circuit thanks to Dirtbox layouts and his awesome selection of circuits. A modified ODR-1 Overdrive going into a blues-breaker with added headroom. It's on my board in Looper 2- overdrives, at the end. Timmy at front for stacking if wanted, Bluesbreaker with HEADROOM at the back. It works really well. Bluesbreaker on it's own, ODR-1 on it's own. Put them together for even more. Stacking other pedals into the bluesbreaker is keeping it there. I highly recommend to try. I have used shielded/grounded wire on input and output to help ensure no noise issues, as it's close quarters inside a 1590BB2. The LED's are running off a piece of vero also.


I'm starting to get very happy with how a pedal I've made looks. The enclosure is "silver hammer" 1590bb2 from Tayda. Acid etching enclosures and patching cock-ups with plates has led me think this one up. I just recycle old aluminum flashings, whatever looks like it will work. Most polishes up Ok. Some are a alloy and for that reason I started converting my hydrochloric acid to Ferric Chloride. It's relatively simple and I've found works well, and with other metal such as brass. It's all just hacksaw and file and plenty of patience. Drew it up on Inkscape and went from there. For now this is where I want to head on the look, which is becoming somehow a big part of the whole experience.